As preparation for SDNCON, I wanted to set up a Mininet network simulation environment, to use for experimentation. Because I had a KVM host with sufficient space handy I decided to set up an test environment, within KVM, on that host. This post describes installing the virtual machine and Mininet.
Installing Ubuntu 14.04 LTS VM, on KVM
Ubuntu 14.04 LTS can be interctively installed from the Server ISO image within KVM, by taking advantage of the ability to us VNC to see a graphical console, and the ability to boot from an ISO image directly. Either the 32-bit (i386) or 64-bit (amd64) image should work if your KVM host machine is 64-bit capable; this example uses the 64-bit version.
First, download the appropriate ISO image somewhere convenient on the host system, eg:
cd /install
wget http://linux.citylink.co.nz/ubuntu-releases/trusty/ubuntu-14.04-server-amd64.iso
Then create a disk are for the VM to use as its main disk:
sudo lvcreate -n mininet_sda -L 12G /dev/r1
To install, create a libvirt XML machine definition for installation, and introduce it to libvirt:
sudo virsh --connect qemu:///system
create /etc/libvirt/qemu/mininet.xml
(Note that the arch parameter should be
x86_64
for 64-bit, and could be i686 for 32-bit -- but the 32-bit image
will also run on a 64-bit emulated CPU.)
If successful that will start the virtual machine, booted from the CD image, which will sit waiting at the installation prompt. To proceed you need to use VNC to connect to the emulated console. Eg,
sudo port install vnc
ssh -L 5949:localhost:5949 KVMHOST
vncviewer 127.0.0.1:5949
(port install is using MacPorts; the vnc port is used, rather
than tightvnc, because tightvnc cannot be installed on OS X
Mavericks at present,
apparently due to an issue in the Concat3
macro,
which seems to be an incompatibility between imake and
clang, but hasn't been
fixed in the last 5+ months :-( )
If successful, the usual Ubuntu 14.04 installer will be waiting. Do a basic installation, choosing to install the OpenSSH server, but no other features. (I followed the guided disk partitioning and let it use LVM, for possible future flexibility.)
Once the install is complete, you should be able to ssh in using the password you chose. For future convenience install your ssh keys:
mkdir .ssh
chmod 700 .ssh
vi ~/.ssh/authorized_keys
chmod 400 .ssh/authorized_keys
While there, install the outstanding package updates:
sudo apt-get update && sudo apt-get dist-upgrade
sudo apt-get clean
And arrange for the system to use a serial console rather than a graphical console (more easily accessible from KVM):
sudo sed -i.bak '
s/^.*GRUB_HIDDEN_TIMEOUT=.*$/#GRUB_HIDDEN_TIMEOUT=0/;
s/^.*GRUB_TIMEOUT=.*$/GRUB_TIMEOUT=10/;
s/^.*GRUB_CMDLINE_LINUX_DEFAULT=.*$/GRUB_CMDLINE_LINUX_DEFAULT=""/;
s/^.*GRUB_CMDLINE_LINUX=.*$/GRUB_CMDLINE_LINUX="console=ttyS0,115200"/;
/GRUB_TERMINAL=console/a\
\
GRUB_TERMINAL=serial \
GRUB_SERIAL_COMMAND="serial --unit=0 --speed=115200 --word=8 --parity=no --stop=1"
' /etc/default/grub

sudo update-grub
(Sed commands inspired by Ubuntu bug 1220740; see also Ubuntu's GRUB2 help page.)
Also ask upstart to run a getty on the serial console to allow
logins on the cconsole: by installing this upstart job
description
into /etc/init/ttyS0.conf, and then running:
sudo start ttyS0
Finally shut down the virtual machine:
sudo shutdown -h now
and replace the install time libvirt KVM file, with a simpler one that omits the ISO image and graphical console, and then start the virtual machine up again. Eg,
sudo virsh --connect qemu:///system
define /etc/libvirt/qemu/mininet.xml
edit mininet
start mininet
console mininet
At which point the serial console (reached by libvirt) should show the grub messages, Linux boot messages, and a getty which allowed logging in.
"WRITE SAME failed. Manually zeroing"
If you get reports of "WRITE SAME failed. Manually zeroing" logged
to the console, they seem to be caused by this patch to the SCSI
disk driver in Linux
3.7+
(and a later patch which enabled WRITE SAME via the disk mapper
path from Linux 3.10 onwards), which enables use of the SCSI "WRITE
SAME" command (write multiple blocks with the same content -- Linux
seems to use it mostly for ensuring blocks contain all zeros).
The patch defaults to using 0xFFFF (65535) blocks for WRITE SAME,
except for certain classes of disks (ATA, USB, and Firewire) which
are known not to implement the feature (and will use more if SCSI
READ SUPPORTED OPERATION CODES reports more). It appears that
particularly for certain virtualised disks (eg, KVM, perhaps only
older KVM installs -- my host machine still runs Ubuntu 10.04 LTS),
this results in assuming WRITE SAME functionality will work even
if it is not supported. (Various
people have
found
this
problem,
in various kernels; it looks like there is a patch to disable it
if it
fails)
The work around where it is being inappropriately
used is to manually
set max_write_same_blocks to 0 for the underlying SCSI devices in the
/sys file system -- this needs to be done each boot. The affected
SCSI devices can be found with:
find /sys/devices -name max_write_same_blocks
and something needs to write 0 into the file; on machines with
systemd people are using /etc/tmpfiles.d to do that. For Ubuntu
14.04 it looks like the simplest solution is to create a simple
script called
"disable-write-same",
(in /usr/local/sbin), that finds all the max_write_same_blocks
files, and echos 0 into them -- then add a call to that to
/etc/rc.local. (For good measure run the script immediately, to
avoid rebooting.)
ETA, 2014-07-31: I also found I needed to do the same thing when installing under VMWare Fusion.
Installing Mininet
Mininet can be installed from packages (see "Option 3"), and on Ubuntu 14.04 LTS this gets Mininet 2.1.0, from September 2013, which seems to the current stable release.
sudo apt-get install mininet
sudo service openvswitch-controller stop
sudo update-rc.d openvswitch-controller disable
sudo mn --test pingall
Mininet can use additional packages if they're installed, but most of those requirements should be more required for older Linux distributions than Ubuntu 14.04 LTS, so I skipped running that installer. (The main thing missing is the user-space reference switch -- see the tips below -- because we install Wireshark ourselves below. And some of the optional OpenFlow controllers, which requires modifying some of the examples -- see the tips.)
Installing Wireshark 1.12.0-rc2 (with OpenFlow protocol decoder)
Wireshark had a good OpenFlow dissector added during the 1.11 development cycle, which will be released with Wireshark 1.12. It is invaluable for working with OpenFlow 1.3 controllers in particular. The current development release candidate is 1.12.0-rc2 from about a month ago (see Wireshark Git Repository Summary).
For some platforms it is possible to download Wireshark development releases, including 1.12.0-rc2, but for Ubuntu 14.04 it is necessary to build from source. I built Ubuntu 14.04 packages for adminstrative simplicity later.
Install Wireshark build dependencies
There are lots of versions of Wireshark (GUI and console), so it has a fairly extensive set of build dependencies. These dependencies were determined somewhat iteratively:
sudo apt-get -y install build-essential   \
                        libgtk2.0-dev     \
                        libpcap0.8-dev    \
                        flex              \
                        dpatch            \
                        libc-ares-dev     \
                        xsltproc          \
                        docbook-xsl       \
                        libcap-dev        \
                        bison             \
                        libgnutls-dev     \
                        portaudio19-dev   \
                        libkrb5-dev       \
                        libsmi2-dev       \
                        libgeoip-dev      \
                        imagemagick       \
                        xdg-utils         \
                        libqt4-dev        \
                        libgtk-3-dev      \
                        python-support    \
                        python-ply        \
                        quilt             \
                        liblua5.2-dev     \
                        libnl-genl-3-dev  \
                        libnl-route-3-dev \
                        asciidoc          \
                        cmake
and will install about 850MB of packages. (Most of them are not
needed to run tshark/wireshark, only to build it.)
ETA, 2014-07-29: if you have the ISO image handy, you can avoid some of these downloads by making the ISO image available as a CDROM to the virtual machine, then adding, eg:
/dev/sr0 /media/cdrom auto rw,user,noauto,exec,utf8 0 0
to /etc/fstab, so that mount /media/cdrom will work, after which
you can do:
sudo apt-cdrom ident
sudo apt-cdrom add
to make the CDROM available to the virtual machine. (But most of the dependencies are not on the CDROM anyway.)
Clone the wireshark git repository
To make it easier to build a later version (since the version that we're building is a release candidate), we clone the git repository, straight onto the 1.12.0-rc2 tag:
sudo apt-get install git
cd /usr/local/src
sudo mkdir wireshark
sudo chown "${USER}:${USER}" wireshark
cd wireshark
git clone https://code.wireshark.org/review/wireshark --branch v1.12.0-rc2
This is about 400MB of git repository to download, so it will take several minutes to clone the first time.
ETA, 2014-08-06: Wireshark 1.12.0 has been released, so we can build that stable release instead, with:
git clone https://code.wireshark.org/review/wireshark --branch v1.12.0
However at present building as a Debian Package straight from git
fails due to changed symbols (the debian/*.symbols files don't
appear to have been updated since an earlier release candidate).
Fortunately Debian have already solved this problem, so in order
to actually build a package it is necessary to do:
git branch v1.12.0-debian v1.12.0
git checkout v1.12.0-debian
and then copy in the symbol files taken from the Debian Unstable
package source (extracted
from the debian tar file). These are
debian/lib{wireshark5,wiretap4,wsutil4}.symbols.
git commit -m 'Adopt debian/*.symbols from Debian Unstable' debian/*.symbols
(Alternatively the actual Debian source package could be rebuilt on
the target system. The only remaining advantage to rebuilding from git
is that it is possible to, eg, merge in fixes from the
origin/master-1.12 branch and rebuild.)
Build wireshark packages
cd /usr/local/src/wireshark/wireshark
dpkg-buildpackage -rfakeroot
Which will take many minutes to build all the source for all the different packaged versions.
Install tshark
tshark is the command line version of wireshark, useful for quick analysis. It has a few dependencies which we need to install first, and then we can install tshark (the dependencies outside the wireshark packages already got dragged in during the build phase). To install:
cd /usr/local/src/wireshark
sudo dpkg --install libwireshark-data_1.12.0_all.deb  \
                    libwireshark5_1.12.0_amd64.deb    \
                    libwsutil4_1.12.0_amd64.deb       \
                    libwiretap4_1.12.0_amd64.deb      \
                    wireshark-common_1.12.0_amd64.deb \
                    tshark_1.12.0_amd64.deb
Enable the Openflow dissector
Wireshark can be configured to do OpenFlow decoding automatically:
mkdir ~/.wireshark
echo "openflow.tcp.port: 6633" | tee -a ~/.wireshark/preferences
which tells Wireshark to assume that traffic on TCP/663 (the default OpenFlow port) is OpenFlow, and should be decoded.
Example usage
tshark can be used in place of wireshark in something like the
Mininet walkthrough, using a command
like:
sudo tshark -Ttext -d tcp.port==6633,openflow -O openflow_v4,openflow_v1 -P -tad -i lo -f 'port 6633'
which will decode both OpenFlow 1.0 (openflow_v1) and OpenFlow
1.3 (openflow_v4) (the numbers are based on the OpenFlow Protocol
Version byte).
Mininet tips
Most of the Mininet walkthrough can be run as-is in the environment installed above, using tshark in another terminal rather than the GUI wireshark setup described in the walkthrough. However some features require a little more attention.
Using xterms
When using Mininet remotely like this, if you want xterms on each of the Mininet nodes, then it's necessary to use ssh forwarding:
ssh -CY MININET_VM
and ensure that the environment (eg, $DISPLAY) is preserved into
the Mininet environment:
sudo -E mn -x
and if the network is remote it might take a short while for the
xterms to appear. (ssh's -C is used for compression to reduce
the delays with transferring larger amounts of data remotely, and
-Y is used in preference to -X to avoid the warning "untrusted
X11 forwarding setup failed: xauth key data not generated", caused
by the X Server in OS X not supporting the untrusted mode.)
Alternatively:
sudo -E mn
mininet> xterm h2
can be used to more selectively start up the xterms.
Seeing the OpenFlow flows within the switch xterm
The Mininet walkthrough
uses the old dpctl command (from the original reference OpenFlow
implementation) to display flows, from within an xterm. More
recently (eg the last year or so) it is easier to use the Open
vSwitch tool,
ovs-ofctl. For instance display the flows installed in the switch
from the switch xterm, use:
ovs-ofctl dump-flows tcp:127.0.0.1:6634
(which is more interesting once you have, run ping to cause the OpenFlow controller to install some flows into the switch to permit the traffic!)
dpctl dump-flows does work from the mininet prompt -- presumably Mininet
is translating it appropriately, and the walkthrough did not get updated
for the new command line option.
ofdatapath
Without installing more software the user-space switch (ofdatapath)
is not present, so the Mininet walkthrough for other switch
types will not
work. I decided it was not worth the effort to install for that
feature, as the kernel mode Open vSwitch
is sufficient for my purposes. (I do not see a need to run
everything in its own
namespace
either.)
Mininet examples
The Mininet examples
can be reviewed directly from the GitHub repository, and are also installed
in /usr/share/doc/mininet/exmaples for ease of use (although some of
them are installed compressed as a space saving measure, so will have
to be uncompressed before they can be used).
For instance the ssh daemon per
host example
is installed at /usr/share/doc/mininet/examples/sshd.py -- but
unfortunately it cannot be run as-is, because it expects to find a
controller binary called "controller", which does not exist. The
solution is to modify the file to explicitly specify the
OVSController. Eg,
from mininet.node import OVSController
up near the other imports, and:
net = TreeNet( depth=1, fanout=4, controller=OVSController )
in the __main__ section at the end. After that you can run:
sudo -E ~/sshd.py
and then from another terminal ssh into the test nodes:
ssh 10.0.0.1
and if you have ssh keys set up, and use ssh agent forwarding, then you will be logged straight in (otherwise enter your password for the mininet host). Beware that the prompt does not change (by default) so try to keep track of where you're logged in!
More generally:
from mininet.node import OVSController
...
net = Mininet(topo = topo, controller = OVSController)
or similar can be used in other examples.
Going further
There is an entire introduction to Mininet on the Mininet GitHub wiki, which provides more information on how it works, including API documentation for the Mininet Python API.
There is also an extensive Mininet FAQ
Vandervecken
Vandervecken is a codename given to a particular RouteFlow fork. It is distributed as an ISO image, which (as of 2014-07-16, and version 0.85) bundles a Ubuntu 12.04 LTS Live CD with various RouteFlow and OpenFlow related tools. There is some documentation in a Google Doc (cached copy).
By default it is designed to run on a stand alone PC with 4GB of RAM, but it will boot on a system with 1GB or less -- and offers a means to install to a hard drive (which reduces the RAM requirements, due to not needing a huge RAM disk). The setup to run in KVM is similar to the to the Ubuntu 14.04 LTS installation described above; it is best booted attached to a network segment that has DHCP, and a path to the Internet -- but behind a firewall (!!) because it boots up with default passwords.
Installing Vandervecken to a harddrive
Once booted, it can be installed onto the hard drive image (that is at least 7.5 GB in size) with:
sudo -s                           # see documentation for password
apt-get --reinstall install openssh-server    # generate host keys
passwd root                       # explicitly set root password
then connecting to the VM via ssh:
ssh -CY root@VANDERVECKEN_DHCP_IP
and running:
ubiquity
to install. Assuming that you gave the VM a fresh hard drive partition to work with, choosing the default "Erase disk and install vandervecken" is the easiest option. It is easiest to choose to keep working, then manually shut down the VM and change to a "boot from hard drive" configuration (eg, as done above with the mininet VM).
When the install boots up again, it'll be necessary to reinstall
the openssh server again, and reset the root password (as those were
only temporary changes made in the LiveCD). Also beware that the
ssh host key will change as a result of reinstalling OpenSSH. The
installed VM can be converted to a serial console in the same way as the
mininet VM above. It also very useful to comment out the extra
network interfaces in /etc/network/interfaces to avoid excessive
boot delays with "Waiting for network configuration..." :-)
Running the Vandervecken demo
To run the standalone vandervecken demo without running it from
a ramdisk (which requires more than 1GB of RAM, as the ramdisk will default
to at most half the RAM!), edit the bootstrap
script (in /root/bootstrap-lxc.sh) to not make a ramdisk on
/var/lib/lxc, and instead allow everything to be unpacked directly
onto the hard drive. Eg,
cp -p bootstrap-lxc.sh bootstrap-lxc-ondisk.sh
vi /root/bootstrap-lxc-ondisk.sh
cat /root/bootstrap-lxc-ondisk.sh
which gives:
#!/bin/sh
cd /
start lxc
modprobe -r bridge
modprobe openvswitch
tar zxvf /home/projectw/clean-rfvm1-b1-b2.tgz
and when run (sudo ./bootstrap-lxc-ondisk.sh) takes about 1.4GB. Once
that is unpacked, you can run the projectw script:
sudo ./projectw.sh --ryu
and then in a second connection to the vm:
sudo ./b1.sh
and log in as "root" (password in the documentation), and run ping
172.31.2.2 (b2's IP -- note the latency of the emulated newtork
is quite high so you can see it is remote).
If you exit (eg, ctrl-c) out of the projectw.sh script, then all the
containers will be shut down too.
Vandervecken and Mininet
Vandervecken can be run without the demo environment, to control an external switch. To do this, in the Vandervecken VM do:
cp -p projectw.sh projectw-mininet.sh
sed -i.bak 's/STARTBVMS=.*$/STARTBVMS=0/;' projectw-mininet.sh
sudo ./projectw-mininet.sh --ryu
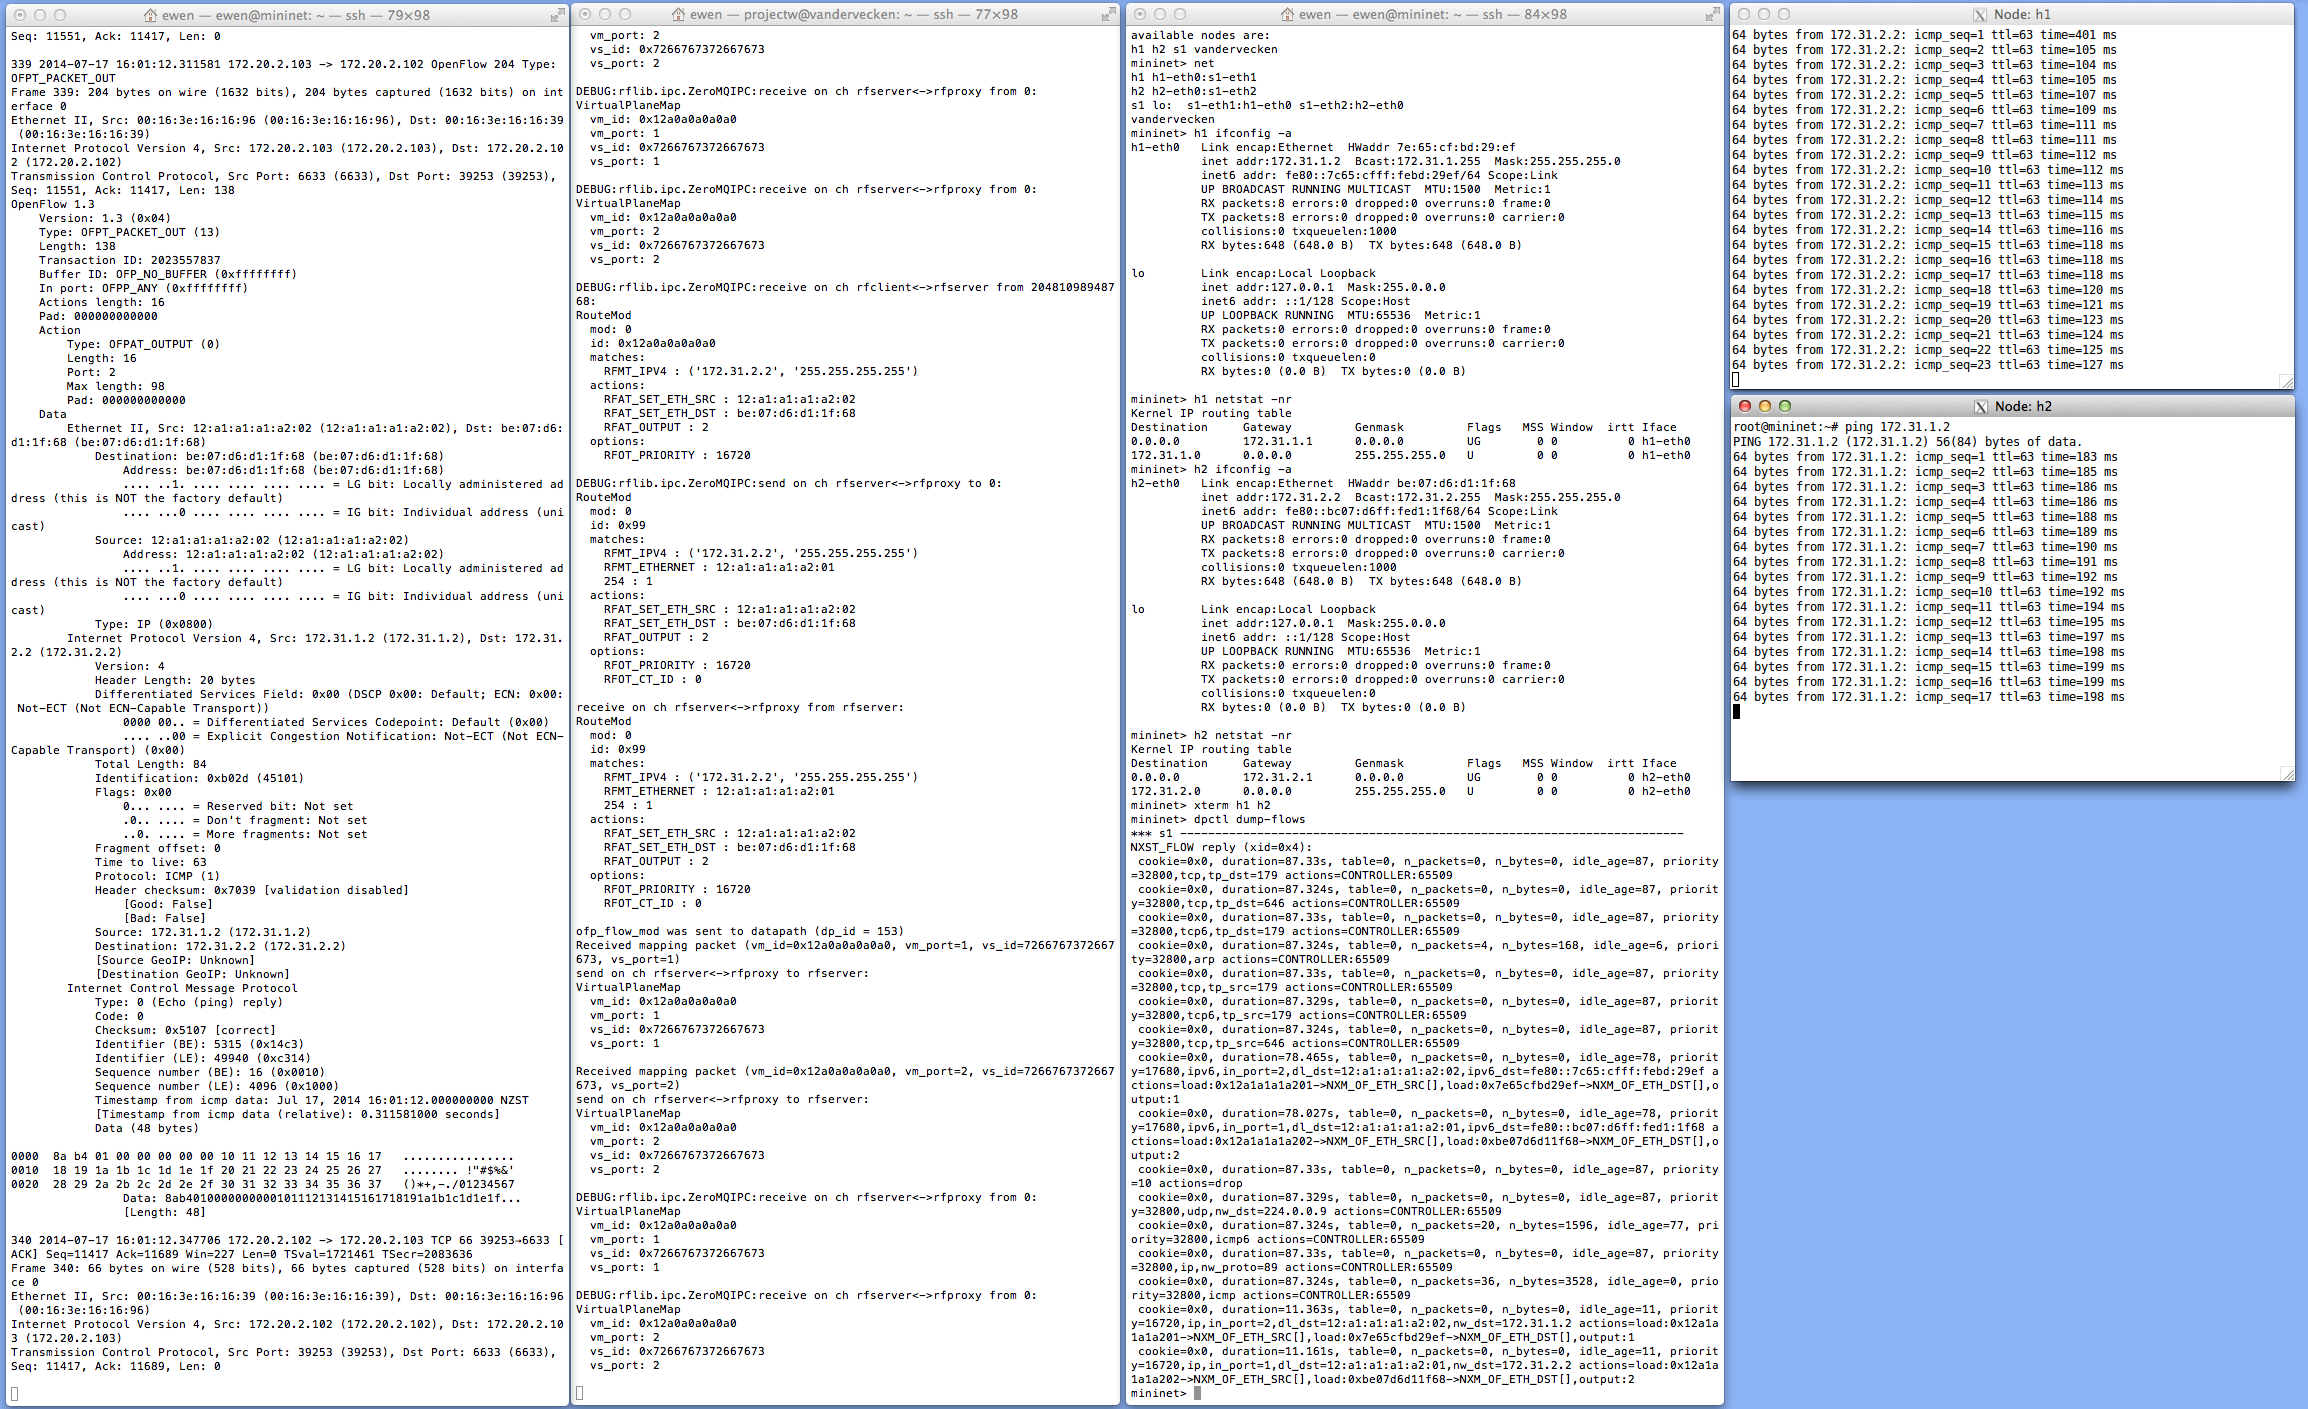
and in the Mininet VM, use the vandervecken-mininet.py to start up a compatible Mininet environment. Beware that script hard codes the IP of the Vandervecken (Ryu) controller, and also has a hack to enable OpenFlow 1.3 support on the Mininet switch, becuase AFAICT Mininet always starts the switches in OpenFlow 1.0 only mode (the Open vSwitch default; see also SDN Hub OpenFlow 1.3 tutorial) -- and the Vandervecken Ryu requires OpenFlow 1.3.
Run the Mininet environment with:
sudo -E ./vandervecken-mininet.py
And then start some xterms for the two hosts:
xterm h1 h2
And in h1 run 'ping 172.31.2.2' (IP of h2), and in h2 run 'ping 172.31.1.2'; all working well, you should get return traffic going back and forth, as well as OpenFlow traffic that you can see with:
sudo tshark -Ttext -d tcp.port==6633,openflow -O openflow_v4,openflow_v1 -P -tad -i eth0 -f 'port 6633'
between the Open vSwitch (s1) and the Vandervecken controller.